
I was in Kohl's recently and found myself in the kitchen appliance department. Of course I ended up there. I cook. I have a blog where I post recipes and pictures of the dishes I prepare. Where else would I end up in Kohl's? It was a leisurely Saturday afternoon, so I was browsing all the countertop appliances and thinking "Oh, I need that" or "I'm not sure I would use that" or "I already have that", when all of a sudden I saw it. The Dash Mini Pie Maker!

Before I knew it, there I was, standing in line, holding the box containing a mini pie maker and wondering what I was going to do with this little contraption. Would this be a good buy or would it be exiled to the back of a cabinet never to be used. Read on.

Got home and opened the box and checked out the little recipe book that was included. Mini apple pie caught my attention, so it was off to market to start gathering. First item on the list was honeycrisp apples.

Honeycrisp's are perfect for cooking. They are crispy and sweet-tart flavored, but not over-the-top tart or sour like a Granny Smith apple. When I was first learning to cook, I made a Waldorf Salad with Granny Smith apples for a dinner I was serving and WOW!!!! That was not popular with my dinner guests that night.

We started with 3 cups of diced apples. Recipe said to slice them thinly but small chopped worked better for me.

Two tablespoons of butter into a hot skillet and fully melted, but not browned.

Into the hot skillet with the chopped apples.

Move the apples around in the skillet so they are completely coated with the melted butter. This doesn't take long. One to two minutes, stirring constantly so the apples do not burn or turn brown.

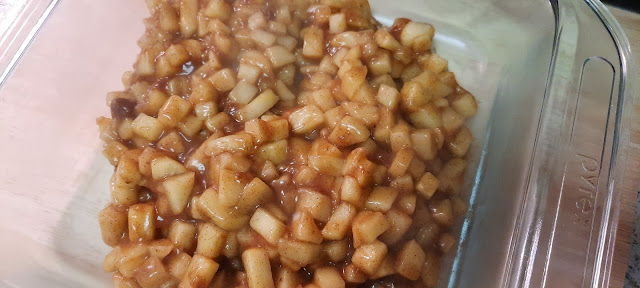
Once the apples are thoroughly coated with the butter, add to the skillet, one teaspoon cinnamon, three teaspoons sugar, four teaspoons cornstarch, and four teaspoons water (you will add more water during the cooking process).

Cook the apples and seasonings for approximately two minutes or until all the water has evaporated. I found that the original four teaspoons of water evaporated very quickly, so I continued to add water in four teaspoon measures, as needed, to keep the apples from burning during the two minute cook time.
Move the apple mixture to a dish to cool slightly while you prepare the mini pie maker crust. NOTE: You can make the pies right away when you take the apples off the flame or you can put the apples in a sealed container and place in the refrigerator and make the pies later. Just know that you will need to heat up the portion of apples you put in the pie before actually baking in the pie maker if you want "warm" apple pie. The pie maker basically just cooks the crust around the filling, so if you take it out of the refrigerator and place it inside the crust in the cooker, the filling will not warm sufficiently.

I used these prepared pie crusts from Pillsbury. They are delicious and so easy to handle and they save a huge amount of time compared to making your own pie crust. I also picked up a box of phyllo dough. I think I'll give that a try in the coming weeks.

The mini pie maker comes with this duo-sided rimg for cutting out your pie crust. One side is for the pie base, which goes in the bottom of the unit.

The other side is for the pie top, which makes a smaller ring of dough that is placed on top of the pie base once it is filled.

The dough comes wrapped in a waxed paper sleeve.

I decided to lay down a sheet of waxed paper and work with the dough on top of that rather than using the flour method. So much easier and so much less clean up. Oh, and let the dough come to room temperature before you start working with it. I did not and it was a bit of a challenge.

Here we have our two rounds cut from the dough, the larger for the bottom and smaller for the top.

Very ingenious design here. I've got to give it to Dash and their design team. The dough cutter for the bottom portion not only cuts the dough into a round, but it scores it at specific points so that you can fold it in and around making a bowl shape into which you place the filling. Very smart.

Into the dough "bowl" with the apple filling. The recipe calls for one-half cup and that is just about right. I used maybe a little less than one-half cup and it was the perfect amount of apples.

On with the top round of dough. I used a small cookie cutter in the shape of a rabbit head. Or maybe that is a chipmunk head. A squirrel. I don't know exactly but it was cute, so that's all that matters.

Closed the top and four minutes later I had a mini apple pie.

A side view so you can see that the two pieces of dough sealed nicely. I would add a little bit of water around the top of the bottom portion of dough before placing the top section on next time. That will help the two sections bond even tighter together.

A scoop of vanilla ice cream and a generous sprinkling of cinnamon sugar, and you have a lovely treat for yourself or for guests.

My first bite. This was really delicious and a cute presentation. The apple filling recipe will give you enough filling for four to five pies. As I said, you can make the filling ahead and store it in the refrigerator, but you will need to warm it up before assembling everything for the pie maker. Otherwise you will have a wonderful warm pie crust, but cold filling. Of course, that might be how you prefer it and if so, then go that route. This is a handy little appliance that I think I will have fun with over the years. If I was having guests, I would likely make these ahead of time, maybe the day before and keep them in the refrigerator and then heat them on low in my steam oven just before serving. A slice of room temperature cheddar cheese on the place would be nice also. I would leave off the cinnamon sugar if you add the cheddar cheese.
So my advice is, if you are so inspired, pick up one of these little pie makers. I enjoyed experimenting with it and I will use it in the future. There are additional recipes in the booklet that I would like to try.

No comments
Post a Comment